OVERVIEW :: MODEL 11 :: MODEL 11-DS :: MODEL 12 :: MODEL 14 :: MODEL 15 :: model 16 :: MODEL 20 ::
DIMENSIONAL CHART :: MAINTENANCE & INSTALLATION
Tate-Jones units are for use in low pressure applications (5 PSI) where 100% shutoff is not required.
Installation Instructions
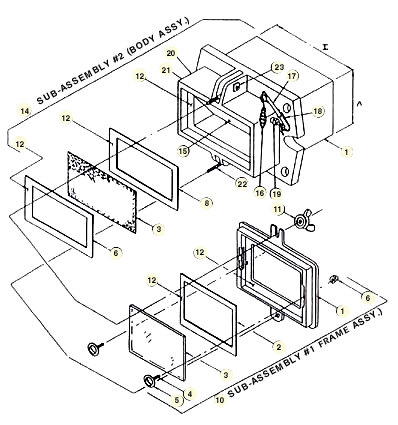
| PARTS LIST | ||
| 1 | FRAME | |
| 2 | * | FRAME GASKET |
| 3 | * | GLASS |
| 4 | TRUSS HEAD BOLTS (2 PER UNIT) | |
| 5 | TRUSS HEAD GASKETS (2 PER UNIT) | |
| 6 | ACORN NUTS (2 PER UNIT) | |
| 7 | BODY | |
| 8 | * | BODY GASKET (2 PER UNIT) |
| 9 | * | S.S. SCREEN |
| 10 | SUB-ASSEMBLY #1 (FRAME ASSY.) | |
| 11 | WING NUTS & METAL WASHERS | |
| (2 EA. PER UNIT) | ||
| 12 | * | SEALANT |
| 13 | * | MTG. FLANGE GASKET |
| 14 | SUB-ASSEMBLY #2 (BODY ASSY.) | |
| 15 | SHUTTER | |
| 16 | WIRE DROP HANDLE | |
| 17 | HANDLE ROD | |
| 18 | TORSION SPRING | |
| 19 | COMPRESSION FITTING W/ PACKING | |
| 20 | PIPE PLUG W/ NUT | |
| 21 | PIPE PLUG | |
| 22 | EYE BOLTS | |
| 23 | BOLT W/ SQ. NUTS | |
| * | INDICATES RECOMMENDED | |
| SPARE PARTS | ||
• Cut hole in furnace wall approx. 1/8″ larger than the A & I Dimensions.
• Position studs provided by customer.
• Place flange gasket (13) to flange on Saf-T-Eye® (E Dimension).
• Insert into furnace wall opening.
• Securely tighten nuts on studs.
• See catalog dimension sheet for stud location & furnace wall hole dimensions.
• Cleaning or replacing of glass can be done while equipment is in operation
– To clean the interior of the glass, the frame (10) must be removed from the body (14) of the Saf-T-Eye®.
– When this is done, the Saf-T-Eye® is no longer considered pressure tite.
– We recommend this procedure (as shown in sub-assembly, #1 & #2 be used once the glass has been cleaned or replaced before the equipment is put back in to operation.
| Components of Assembly | |
| (10) Sub-assembly #1 (Frame Assy) Apply 1/8″ bead of sealant (12) to interior lip of frame (1). Place frame gasket (2) onto sealant (12). Repeat with 1/8″ bead of sealant (12). Position glass (3) into place on sealant (12). Position truss head gaskets (5) over holes in the interior of frame (1) & place truss head bolts (4) thru holes. Place acorn nuts (6) over truss head bolts (4) on exterior of frame (1) & tighten with extreme care or glass may break. |
(14) Sub-assembly #2 (Body-Assy.) Apply 1/8″ bead of sealant (12) to interior lip of body (7). Place gasket (8) onto sealant (12). Repeat with sealant(12). Place screen (9) onto sealant (12). Place gasket (8) onto screen (9). Repeat with sealant (12). Place assembled frame (10) onto sealant (12). Position metal washers & wing nuts (11) in place & tighten. |
